How to work model-first
LLBLGen Pro supports both Database First and Model First
development. This article describes briefly which functionality of the
designer is available to you when you want to work Model First as
well as how the typical Model First work flow looks like.
Work flow of Model First
The schematic workflow of Model First development looks like
the following:
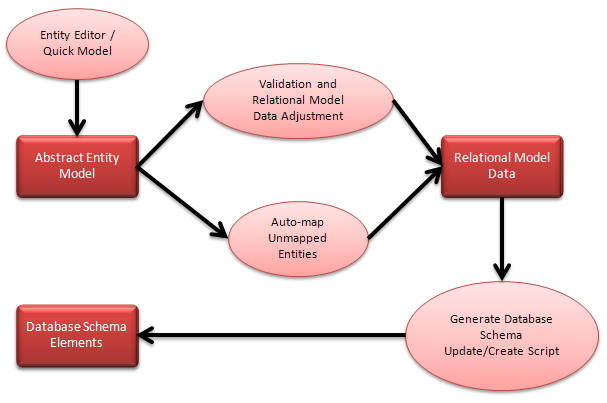
Schematic workflow of Model First
The flow of data is from the editors for the Abstract Entity Model
towards the RDBMS using the Relational Model Data storage in the project as
a stop in between them. This has the advantage that you can keep working on
the relational model data through the Abstract Entity Model without the
necessity to be connected to the RDBMS.
A couple of processes are used to get from
an Abstract Entity Model to a schema definition in an RDBMS:
Auto-map
Unmapped Entities,
Project
Validation and Relational Model Data Adjustment and
Generate Database Schema Create / Update
Scripts. Auto-map Unmapped Entities results in relational model
data in the Relational Model Data storage, if new elements have to be
created, and mappings between the elements in the Abstract Entity Model and
the elements in the Relational Model Data storage. The changes made to the
relational model data are
exportable as a
Create script or Update script. The scripts are then usable to create a
new schema or update an existing schema in an RDBMS.
Let's break this down into smaller steps, from creating an entity in
the Abstract Entity Model to a Create script for a schema. The following
steps use the conventional tools, not
Quick Model,
however if you want to create the entity using Quick Model, you're free to
do so.
- Create a project in the LLBLGen Pro designer and choose a target
framework
- After you have examined and eventually adjusted the
Project
Settings and have clicked OK, click the New Entity button
on the toolbar, or press cntrl-shift-E or select Project -> New ->
Entity, to create a new entity definition. Specify a name for the
entity in the dialog, e.g. 'Customer', and click OK.
- Right-click in
Project
Explorer the entity you just created and select Edit... from
the context menu. The entity is opened in its
Entity Editor.
- Click the top row in the grid on the
Fields
tab and specify a name and a type for the first field, e.g. 'Id' and
'int', using the TAB key to move between columns and complete
pre-selections in the columns. Press TAB to move the cursor to the
Optional column and press cntrl-Enter to add the field.
- Press cntrl-shift-F to add a new field, e.g. 'Name' and as type
'string'. Again press cntrl-Enter to add the field
- Repeat step 5 a couple of times till you have enough fields in your
entity.
- Click the Edit... button next to the Identifying Fields
text box. In the dialog popping up select the Id field you
created in step 4 to mark it as the Identifying Field (the 'pk')
- To create relational model data, the designer requires a Relational
Model Data storage to place the data in. Right click the 'Relational
Model Data' node in the
Project
Explorer or
Catalog
Explorer and select Add Relational Model Data Storage for a Database
from the context menu. In the dialog, select the database you want to
use in your project. Keep in mind that DDL SQL scripts aren't supported
on MS Access, so choose a database other than MS Access.
- Right-click Entities in the
Project
Explorer and select
Auto-map Unmapped Entities. This will make LLBLGen Pro create a new
table in the Relational Model Data storage added in step 8 and mappings
between the entity you created in steps 2-6 and the newly created table.
A log is shown what actions have been taken for you. To examine the
mappings, click the
Field Mappings tab of the editor of the entity you created. To
quickly find the table created, click the Lookup button next to the
Mapping Target on the Field Mappings tab to go to the node of the
table in
Catalog Explorer.
- The designer can't always automatically update the relational model
data on the fly when you make a change in the Abstract Entity Model, as
not all actions are 1:1 translatable, so to complete the process, you
have to Validate and Adjust the Relational Model Data by
selecting Project -> Validate and Adjust Relational Model Data or
click the Validate and Adjust Relational Model Data button on the
toolbar. This action performs a full
Project
Validation and also adjusts the relational model data based on the
entity definition. If you don't receive a validation error, everything
is setup properly and the relational model data is adjusted. You should
now see a table definition with primary key and fields in the Catalog
Explorer.
- In
Catalog Explorer rename the schema and / or catalog node if you want
to have a different name for these in your actual database.
- Right click the 'Relational Model Data' node in the
Project
Explorer or
Catalog
Explorer and select Generate Database Schema Create Script (DDL
SQL)
from the context menu. This will bring up the
Code Generation Configuration dialog to guide you through the DDL
SQL script creation process of
exporting a
create/update script.
- Run the generated script on the relational database you have chosen
to work on. Keep in mind that it's likely that you have to manually
create the database / schema in the RDBMS as these operations are often
not scriptable or require manual input. The script contains, when
applicable, code to help you with this.
With Model First you walk every time the steps 2-7 to create entities,
relationships and the like, and after that the steps 9-13 to finalize your
changes to be usable by generated code.
Tools and functionality available to you for working Model First
The designer contains a lot of functionality, both visible and hidden
beneath the surface, which help you work with an Abstract Entity Model using
a Model First workflow. The following list of features are mainly used
for and designed for working Model First.
- Quick
Model. A text based DSL system which lets you quickly specify
entities, relationships and other Abstract Entity Model elements.
- Entity
Editor. The editor for editing entity fields, mappings and other
entity related details.
-
Normal Relationship Editor. The editor which allows you to specify /
edit 1:n/m:1/1:1 relationships between entities
-
Many-to-Many Relationship Editor. The editor which allows you to
specify / edit a Many-to-Many relationship based on two m:1
relationships.
-
Auto-map Unmapped Elements. The mechanism to auto-create relational
model data elements and mappings based on the elements in the Abstract
Entity Model.
- Designer
Preferences and
Project
Settings, especially the relational model data element naming
construction and validation sections.
- Catalog
Explorer with its context menus on various nodes to for example
exclude a set of elements (like a set of tables) or to rename a schema
or table or mark an element (e.g. a field) for deletion.
- Working with Types and Default values using Type Shortcuts
- On the
Field
Mappings tab of the
Entity Editor or other project element editors the following
utilities:
- Create mapping, Remove mapping, New target... and New
sequence... buttons.
- Sync selected... button. This button makes it easier to
sync a model field's type specification with its mapped target
field, e.g. if you changed the mapping
- Auto-map unmapped fields to new target fields button,
which makes it easier to create new target fields on the fly
- Edit field..., New field... and Auto-new field
buttons which allow you to make micro changes to an existing
table field, or create a new table field, either from scratch or
from the current selected field mapping.
- Project
Validation which adjusts relational model data based on the elements
in the Abstract Entity Model.
- Generate
Database Schema Create / Update Scripts. The functionality to export
changes to the relational model data in script form to apply them to the
schema in the RDBMS you want to target.
Additionally, the rich editing system of the designer for the Abstract
Entity Model elements is at your disposal.
Mixing Model First with Database First
It's ok to mix a Model First workflow with a Database First workflow:
The LLBLGen Pro designer performs a
validation
of the project before the refresh process is started and if it detects
changed Relational Model Data, you are required to export those changes
first and apply them to your schema in your RDBMS. Refreshing the relational
model data will then work with up-to-date schema data which matches the
relational model data in the Relational Model Data storage in the project.
For example you could start with Database First and use Model First to
adjust your RDBMS schema after the initial start, instead of using external
tools to do so.